This tutorial is about how to use Cinema 4D, and Basic 3D art.
The first thing you need to know is that EVERYTHING is just made up of basic objects. Take a pop bottle for instance, the body of it is just a cylinder, then the bottom is a half of a sphere either modified, or booled (cut) out to look like how it does, and the top is just a cone with a cylinder covering the top, (if you take it step-by-step and want it to be transparent, boole (cut) out the top of the cone. This tutorial will take you from the beginning, to the very end of the basics of 3D art.
Lesson 1 A: Make a cube. To make a cube, just go to objects in the toolbar, down to primitive and select "Cube." Viola you've created a cube.
Lesson 1 B: Editing: Now if you want to play around with this cube, you'll see at the top you have a cube with 4 arrows sticking out of it selected. That's moving an object. If you want to shrink/grow the object select the triangle with the 2 arrows beside it. When you select that you can pull on any one of the arrows on your cube that represent the x,y, and z axis'. If you want to shrink/grow all the axis' equally then click your mouse on any place where another object is not located and either drag your mouse right (to grow) or left (to shrink). Editing is a tough job to do in the perspective view, so we want 3 more views! Top, right, and front! You'll notice at the top right of your perspective view a little window icon. Click on that to open up your other 3 views. Now each one of your views will have one of its own mini toolbars, if you want to go to a big screen of any one of those views click on the window icon on that views toolbar. For lining stuff up and editing anything at all the perspective view is not recommended.
Lesson 1 C: Materials. Materials add color to an item. They can also be used for texturing. It's not the best, most professional way of texturing, but it is the easiest. At the bottom left under the timeline bar, you should see a small box and ANOTHER toolbar that has 3 commands: File, Edit, and Function. This is the toolbar for your materials. Go to File->Load Materials. This will take you to a browsing window. Select your Cinema 4D Folder->Materials->basics.c4d. Open the basics.c4d file and you will have loaded in some fine-looking materials for many different purposes. To use a material on an object, just click and drag the materials in your toolbar onto the item you want to color on your items list. Items List explained in Lesson 2.
Lesson 2: Extrude Nurbs. Now, for certain things, it may be too hard to use a primitive 3D object. In a case like this we want to make our own. You can either go to Object->Spline Primitive or Object->Create Spline. Creating a spine can be tough, but very rewarding. For this exercise we'll just use a Circle from Spline Primitive. Now, once you have the circle, go to Objects->Nurbs->Extrude Nurbs. In your object list right of your view, you will see two things, a circle and a weird thing labeled Extrude Nurbs. Drag the circle (on the toolbar not on the view) into the Extrude Nurbs. This is called "making the circle a child of the Extrude Nurb," or "making the Extrude Nurb a parent of the Circle." The circle will now have depth to it, but not very much. So select the Extrude Nurbs, go to your toolbar on the left, click the button that has the red pot and an arrow leading to the blue pot (This will be referred to as the "make editable" tool from now on, remember that), and then you may inlarge/shrink the depth of your circle! Of course this isn't a very good use because you could make a cylinder, but Extrude Nurbs can be used on any spline.
Lesson 3: Lathe Nurbs. Arr, Lathe Nurbs are useful little things, but they make me a little bit mad because whenever I use them what I want usually ends up looking like a pot instead of what I wanted. Okay, Lathe Nurbs have to do with Splines like Extrude Nurbs. This one Spline Primitives pretty much useless, so we'll get into drawing your own splines. Play around with the different types of Spline drawing tools. Find out what they're good for, what they're not good for, etc. Now to Lathe Nurbs. Lathe Nurbs take the flat spline, spin it around 360 degrees, and record what it looks like at every different spot to make a 3D image. Choose a spline drawing tool, whichever you think is best for what we're about to draw. We are going to draw a snowman, or rather half a snowman. When using Lathe Nurbs only draw half of what you want. Now that you've made the spline, you'll notice there are key points in the drawing represented by squares, you can move those around to fit what you need if you messed up. In this case line up the 3 that cut off the half exactly (or close to exactly. Now make a Lathe Nurb and make the spline a child of it... Let me guess, your object doesn't look like a snowman, but rather like a pot or a really skinny in some places and fat in other places object. Thats okay, play around with Lathe Nurbs until you feel confident with them.
Lesson 4: Loft Nurbs. Loft Nurbs are possibly the most useful thing ever, in my opinion. Loft Nurbs take by taking 2+ splines and making them 1 3D object in the order you put them. For this lesson, make 3 splines, 2 circles and 1 star. These are in your spline primitives. Now spread them apart on the Z axis. Now make them all children of the loft nurb in this order Circle, Circle.1 Star. They should make 1 big tubular-looking shape that turns into a star at the end. If they don't look like that, spread out the images so it goes circle circle star and if you've already done that rearrange them in the loft nurb correctly.
Lesson 5: Sweep Nurbs. Sweep Nurbs allow you to sweep any shape along a spline. This is useful for creating objects like rubber bands, belts, electrical cords, cables, etc. Sweep nurbs are quite simple, draw a rubber band spline. Now, why don't me make a cable? Draw a spline that looks like a cable (just a straight line don't loop it or anything) Now, make a circle spline, shrink it to about 10 CM. Now, put the spline in the sweep nurb, and put the circle in the sweep nurb, make sure the circle is above the spline in the 'food chain'. Ta da, you should have a cable!
Lesson 6: Hyper Nurbs. Hyper Nurbs are useful for many things, but I won't get into the big things about Hyper Nurbs, just the basics. Okay, make a cube. Now make this cube a child of a Hyper Nurb. You will now see that your cube is a sphere, but it only has 4 sides! This is good for a couple of things: it gives you an easily editable sphere and a LOW polygon count. So basically Hyper Nurbs take one objects and make it another (not sure how thats determined, thus this is just a tutorial on the BASICS). Extra part of this lesson, not req. Anyways, in your items list, select the cube, use the make editable tool, and select the polygon tool. The polygon tool is the tool that is right above the tool that looks like a chess board on your side toolbar. Now, select the top side of the cubesphere, and push it down so its flat, but not completely flat. Now, go to, on your top toolbar, Structure->Extrude. You now have your extrude tool selected, click on the left side of your cubesphere, then click it again hold it and drag it so it jets out more. (you'll notice there's more polygons) Do the same to the right side. Now not on the original top, but the left new top created, extrude it up and do the same to the right side. Do you see those two new top sides? Extrude them both up about the hight armchair armrests would sit if the bottom was the bottom of a chair. Now extrude the main back of the cubesphere a little bit, and it will create yet another top side, extrude that new top side higher than the 'armrests' you extruded. Looks sorta like a chair, right? Just a fun little exercise I though I'd throw in.
Lesson 7: Booles. Booling something out is the exact same as cutting it out. Booles are a very useful thing, VERY useful. You can use them for making things like holes in a wall for windows, or making half a sphere for your image, very useful little things. So basically, this is how booles work. Make a sphere, and make a cube. Make the cube cover half of the sphere. Now, place both items in a boole. To make a bool go to Objects->Modeling->Boole. Now place the cube and the sphere in the boole, and have the sphere on top. If you've done it correctly half of the sphere should be gone. That's how a boole works.
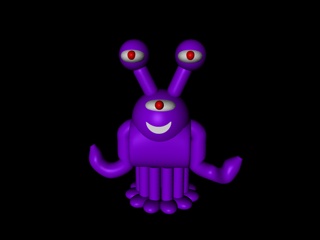
Lesson 8: Arrays. Arrays can be useful for things that you want to be an exact amount apart, and the exact same thing. Like in my picture of the mook senior, his legs I wanted the same length apart and the exact same thing, so I used an array.
Arrays are quite easy to learn how to use. Make a cylinder. Now shrink the cylinder to however small you want it to be. Also, if you haven't noticed by now, below the items list is a small editing thing where you can edit the item in question via numbers, instead of just doing it by eye. Now, make an array, this is also located in Objects->Modeling. Now, make the cylinder a child of the array. Ta da, but default settings you should have 7 cylinders with a total range of 250 CM in a circle. To change this, select your array in your item list, go below to the editing place, and to make more copies of your cylinder, just change the number in the 'copies' editable, and to make them further or closer together, change the number in your 'radius' editable. That's pretty much it for arrays.
Thats the end of this tutorial, but I would always love to here suggestions/questions/any response from the readers of this tutorial. If you want to email me you can reach me at [email protected]. I would also love to see your work. If you make anything with the knowledge I've given you, I would love to see it, so just host it using http://imageshack.us or any other hosting site you want, and send me a link, or just send me the file via email.
The first thing you need to know is that EVERYTHING is just made up of basic objects. Take a pop bottle for instance, the body of it is just a cylinder, then the bottom is a half of a sphere either modified, or booled (cut) out to look like how it does, and the top is just a cone with a cylinder covering the top, (if you take it step-by-step and want it to be transparent, boole (cut) out the top of the cone. This tutorial will take you from the beginning, to the very end of the basics of 3D art.
Lesson 1 A: Make a cube. To make a cube, just go to objects in the toolbar, down to primitive and select "Cube." Viola you've created a cube.
Lesson 1 B: Editing: Now if you want to play around with this cube, you'll see at the top you have a cube with 4 arrows sticking out of it selected. That's moving an object. If you want to shrink/grow the object select the triangle with the 2 arrows beside it. When you select that you can pull on any one of the arrows on your cube that represent the x,y, and z axis'. If you want to shrink/grow all the axis' equally then click your mouse on any place where another object is not located and either drag your mouse right (to grow) or left (to shrink). Editing is a tough job to do in the perspective view, so we want 3 more views! Top, right, and front! You'll notice at the top right of your perspective view a little window icon. Click on that to open up your other 3 views. Now each one of your views will have one of its own mini toolbars, if you want to go to a big screen of any one of those views click on the window icon on that views toolbar. For lining stuff up and editing anything at all the perspective view is not recommended.
Lesson 1 C: Materials. Materials add color to an item. They can also be used for texturing. It's not the best, most professional way of texturing, but it is the easiest. At the bottom left under the timeline bar, you should see a small box and ANOTHER toolbar that has 3 commands: File, Edit, and Function. This is the toolbar for your materials. Go to File->Load Materials. This will take you to a browsing window. Select your Cinema 4D Folder->Materials->basics.c4d. Open the basics.c4d file and you will have loaded in some fine-looking materials for many different purposes. To use a material on an object, just click and drag the materials in your toolbar onto the item you want to color on your items list. Items List explained in Lesson 2.
Lesson 2: Extrude Nurbs. Now, for certain things, it may be too hard to use a primitive 3D object. In a case like this we want to make our own. You can either go to Object->Spline Primitive or Object->Create Spline. Creating a spine can be tough, but very rewarding. For this exercise we'll just use a Circle from Spline Primitive. Now, once you have the circle, go to Objects->Nurbs->Extrude Nurbs. In your object list right of your view, you will see two things, a circle and a weird thing labeled Extrude Nurbs. Drag the circle (on the toolbar not on the view) into the Extrude Nurbs. This is called "making the circle a child of the Extrude Nurb," or "making the Extrude Nurb a parent of the Circle." The circle will now have depth to it, but not very much. So select the Extrude Nurbs, go to your toolbar on the left, click the button that has the red pot and an arrow leading to the blue pot (This will be referred to as the "make editable" tool from now on, remember that), and then you may inlarge/shrink the depth of your circle! Of course this isn't a very good use because you could make a cylinder, but Extrude Nurbs can be used on any spline.
Lesson 3: Lathe Nurbs. Arr, Lathe Nurbs are useful little things, but they make me a little bit mad because whenever I use them what I want usually ends up looking like a pot instead of what I wanted. Okay, Lathe Nurbs have to do with Splines like Extrude Nurbs. This one Spline Primitives pretty much useless, so we'll get into drawing your own splines. Play around with the different types of Spline drawing tools. Find out what they're good for, what they're not good for, etc. Now to Lathe Nurbs. Lathe Nurbs take the flat spline, spin it around 360 degrees, and record what it looks like at every different spot to make a 3D image. Choose a spline drawing tool, whichever you think is best for what we're about to draw. We are going to draw a snowman, or rather half a snowman. When using Lathe Nurbs only draw half of what you want. Now that you've made the spline, you'll notice there are key points in the drawing represented by squares, you can move those around to fit what you need if you messed up. In this case line up the 3 that cut off the half exactly (or close to exactly. Now make a Lathe Nurb and make the spline a child of it... Let me guess, your object doesn't look like a snowman, but rather like a pot or a really skinny in some places and fat in other places object. Thats okay, play around with Lathe Nurbs until you feel confident with them.
Lesson 4: Loft Nurbs. Loft Nurbs are possibly the most useful thing ever, in my opinion. Loft Nurbs take by taking 2+ splines and making them 1 3D object in the order you put them. For this lesson, make 3 splines, 2 circles and 1 star. These are in your spline primitives. Now spread them apart on the Z axis. Now make them all children of the loft nurb in this order Circle, Circle.1 Star. They should make 1 big tubular-looking shape that turns into a star at the end. If they don't look like that, spread out the images so it goes circle circle star and if you've already done that rearrange them in the loft nurb correctly.
Lesson 5: Sweep Nurbs. Sweep Nurbs allow you to sweep any shape along a spline. This is useful for creating objects like rubber bands, belts, electrical cords, cables, etc. Sweep nurbs are quite simple, draw a rubber band spline. Now, why don't me make a cable? Draw a spline that looks like a cable (just a straight line don't loop it or anything) Now, make a circle spline, shrink it to about 10 CM. Now, put the spline in the sweep nurb, and put the circle in the sweep nurb, make sure the circle is above the spline in the 'food chain'. Ta da, you should have a cable!
Lesson 6: Hyper Nurbs. Hyper Nurbs are useful for many things, but I won't get into the big things about Hyper Nurbs, just the basics. Okay, make a cube. Now make this cube a child of a Hyper Nurb. You will now see that your cube is a sphere, but it only has 4 sides! This is good for a couple of things: it gives you an easily editable sphere and a LOW polygon count. So basically Hyper Nurbs take one objects and make it another (not sure how thats determined, thus this is just a tutorial on the BASICS). Extra part of this lesson, not req. Anyways, in your items list, select the cube, use the make editable tool, and select the polygon tool. The polygon tool is the tool that is right above the tool that looks like a chess board on your side toolbar. Now, select the top side of the cubesphere, and push it down so its flat, but not completely flat. Now, go to, on your top toolbar, Structure->Extrude. You now have your extrude tool selected, click on the left side of your cubesphere, then click it again hold it and drag it so it jets out more. (you'll notice there's more polygons) Do the same to the right side. Now not on the original top, but the left new top created, extrude it up and do the same to the right side. Do you see those two new top sides? Extrude them both up about the hight armchair armrests would sit if the bottom was the bottom of a chair. Now extrude the main back of the cubesphere a little bit, and it will create yet another top side, extrude that new top side higher than the 'armrests' you extruded. Looks sorta like a chair, right? Just a fun little exercise I though I'd throw in.
Lesson 7: Booles. Booling something out is the exact same as cutting it out. Booles are a very useful thing, VERY useful. You can use them for making things like holes in a wall for windows, or making half a sphere for your image, very useful little things. So basically, this is how booles work. Make a sphere, and make a cube. Make the cube cover half of the sphere. Now, place both items in a boole. To make a bool go to Objects->Modeling->Boole. Now place the cube and the sphere in the boole, and have the sphere on top. If you've done it correctly half of the sphere should be gone. That's how a boole works.
Lesson 8: Arrays. Arrays can be useful for things that you want to be an exact amount apart, and the exact same thing. Like in my picture of the mook senior, his legs I wanted the same length apart and the exact same thing, so I used an array.
Arrays are quite easy to learn how to use. Make a cylinder. Now shrink the cylinder to however small you want it to be. Also, if you haven't noticed by now, below the items list is a small editing thing where you can edit the item in question via numbers, instead of just doing it by eye. Now, make an array, this is also located in Objects->Modeling. Now, make the cylinder a child of the array. Ta da, but default settings you should have 7 cylinders with a total range of 250 CM in a circle. To change this, select your array in your item list, go below to the editing place, and to make more copies of your cylinder, just change the number in the 'copies' editable, and to make them further or closer together, change the number in your 'radius' editable. That's pretty much it for arrays.
Thats the end of this tutorial, but I would always love to here suggestions/questions/any response from the readers of this tutorial. If you want to email me you can reach me at [email protected]. I would also love to see your work. If you make anything with the knowledge I've given you, I would love to see it, so just host it using http://imageshack.us or any other hosting site you want, and send me a link, or just send me the file via email.